


There are many reasons why we need to have container gardens. The great thing about container gardens is that they can be for both inside or outside. Many of you may think of container gardens simply being limited to some flower boxes on your windowsill or balcony rail or perhaps a few potted plants on your patio or your sunroom. That is not so much true. In these series of articles, you find out how creative you can get with container gardening and how it can be a joy all year round, even in the wintertime.
The electric table is the best beginning for a container garden which can include lights, water features, and more. What exactly is an electric table? Well, basically, an electric table is a table which is fitted with electrical outlets and could also have switches and USB ports wired into it and has a plug with a cord which can be plugged into the wall.
These electric tables can have all kinds of uses, but for a container garden they can be phenomenal. This article will cover the basics of building your own electric table. I personally have not built one for a container garden yet, but I am using the plans for my nightstand to give you an idea how to build one. The concept is the same, just the plugs you might want to wire into yours may differ.
Choosing your lumber for the electric table is basic. Since this table is not being used for gardening purposes, I am using standard 2X4s which you can get at any lumberyard or home warehouse store like Menard’s, Lowe’s or Home Depot. Because container gardens involve pots and dirt, they can be a bit on the heavy side, so you may want to double the 2X4s or get 4X4s for the legs.
Standard pine 2X4s are typically sold in lengths of eight feet and you can cut them down to size. You will need to calculate the number of 2X4s you will need for your project. Typically, eight-foot 2X4s should cost no more than two or three dollars a piece, depending where you purchase them.
In my nightstand, I am using the 2X4s for both the legs of the table, the base of the table and cross bars which will hold the individual electrical fixtures.
Plywood or fine finish wood sheeting should be used for the top of the table, skirting and if you have a multi-tiered table, covering the different tiers to cover any gaps.
See the drawing below to see how to configure the dimensions of your table and using a calculator, you can figure out how much wood you will need.
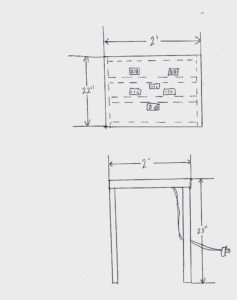
The basic drawing of an electric table
When choosing fasteners for your table, you should use wood screws and wood glue to glue the legs and skeletal structure of the table together. Wood screws hold much better than nails and are less likely to push up as the wood expands or contracts.
When it comes to adding the plywood or fine finish wood on the table top, use a strong wood glue to glue it to the skeletal structure and reinforce it with thin finish nails. You can use a special driving pin to imbed the finish nails into the wood and cover the holes with wood puddy to hide the finish nails. Wood puddy is an off-white color which can be covered with most finishes.
Choosing your hardware is equally as important as choosing your lumber. The hardware includes electrical outlets, switches (if you want growth lamps) and the cable with a grounded male plugin for plugging into a wall outlet.
Wiring your electric table is much like wiring electrical outlets in the wall. The only difference is that the last outlet you are wiring in is the male wall plugin and chord. See photo below.

A six-foot cable with a male wall plugin
There is a huge variety of wall outlets which you can purchase at any hardware store or home supply warehouse store, such as Menard’s, Lowe’s or Home Depot.
Calculating the material you will need correctly so you don’t over or underspend and have the proper supplies to build your electric table with. To begin with, you will need to calculate how many 2X4s you will need to build your table. This is very simple. First, if you are the handyman in the house, you might have scraps of 2X4s around the house from previous projects.
Typically, the normal length of a 2X4 is, as mentioned above, eight feet long. If you look at the first image of the plan for the electric table, you will see that the length is two feet or 24 inches and the width is 22 inches. Then the legs are about 23 inches each.
If you have no scrap 2X4s of substantial length for the project, then you need to calculate how many 2X4s you will need from scratch. First, the legs, 23 inches as almost two feet, in fact one inch short of two feet. You have four legs of the same length. This means that one eight-foot 2X4 will cover all four legs for the table, or if you want reinforced legs for holding more weight, then two eight-foot 2X4s will be needed for the legs.
Now, you have figured out how many 2X4s you need for the legs, you need to figure out how to calculate how many 2X4s you will need to make the top of the table. Again, the same type of calculation is used here also. As you noticed in the first image of the plan, you see some dotted lines going across the top of the table. Well, these are the 2X4s which are part of the skeletal structure under the top of the table. Just around the parameter is not enough. The extra 2X4s not only provide extra support for the weight of all the containers filled with soil and plants, but can also act as a sturdy fastener for your wall plugs.
Here, again, you will need four 2X4s which are just just shy of two feet, then two 2X4s which are 22 inches for the width of the table. Again, one 2X4 is eight feet, so here you will need at least two more and possibly getting one in case you need it.
So, basically, for this project, you will need seven eight-foot 2X4s for the entire skeletal structure or ten if you are reinforcing the legs.
If you have extra scrap 2X4s from other projects, simply measure all the scrap 2X4s you have to make sure you have the proper lengths and deduct those from the eight footers you have to buy.
Electrical hardware needed for your electric table include the plugins, wire, and the six-foot cable with the male wall plugin. When it comes to female plugins for the table, there is a huge variety of wall plugins you can purchase. Many of these you will see in the upcoming articles as we build the table, but will cover some of the basics here.
When making an electrical table, I prefer to get grounded plugins. These are the plugins with the third hole at the top. Notice also the male plugin of the six-foot cable as shown above also has that third prong for the ground. This may not be so important for this table which is being built as a night stand and charging station for a variety of electronic gadgets, but when for a container garden, they are very important.
Water and electricity can be a deadly mixture if you are not careful. Let’s face the facts, water is a conductor of electricity, thus with container gardens, with or without water features, there is always water around. Plants do have to watered. How can we mitigate this shock hazard? Very simple, the very first plugin you should wire from the electric box which is connected to the wall cable should be a GCFI plugin. What is a GCFI? Well, this is basically a plugin with also acts as a small circuit breaker. When a GCFI plugin is wired in, all the electrical outlets on the table become a circuit and if any moisture goes into one of the plugins, the circuit will trip, shutting off the power, thus preventing electrical shock. A GCFI plugin will have a button and a light between the two plugins. If the circuit is tripped, the light goes on and all you need to do is push the button down to reset the circuit and resume power delivery.
Wood for the tabletop is also important. In this table, we are using a nice aspen finish wood with a cherry-red stain and spar eurithain finish. When making a table for your container garden, you could use the same materials, but use a varnish which is designed for exterior use to protect the wood from moisture.
Building an electric table can be great for a wide variety of container gardens. They can be build to be simple and functional to complex and tiered to create an amazing indoor arrangement. In the next few articles, you will learn many aspects of container gardening and how you can use them as winter gardens indoors to propagation stations and more.


