


In the last article, we talked about designing an electric table and how to use the electric table as a base for your various container gardens. Though the electric table in this article is being used as a nightstand and charging table, you will get the picture on how you can use the same concept for creative container gardening.
The first thing we need to talk about before constructing the electric table is about all the electrical components which are needed for the table.
The power source is the most important thing of the table. As shown in the previous article, the power source is simply a male plugin which plugs right into the wall. Note that this article shows materials for US voltage and outlets. If you live in Europe or the UK, you will have to use the electrical hardware which is compatible with the house voltage and amperage there.
For the power source, many hardware stores or warehouse stores sell a six-foot cable with exposed wires on one end and the male plugin on the other, like an extension cord with the female end cut off.
Color codes of wires and screws are very important and must be followed in the strictest manner possible. The reason for this is because electricity is a dangerous force. Most wires you purchase for home wiring have a mass rubber insulation with holds three wires. As you cut this wire and peel off the grey outer insulation, you will notice three wires, one is black, the other white, and the third is either green or naked.
The black wire is the live wire. This is the wire you do not want to touch when plugged in. This wire carries the electric current into the circuit. Most electricians will call this the “hot” wire, since there is current in this wire all the time.
The white wire is the neutral wire. This wire only carries an electric current when the circuit is complete, ie, something is plugged into the circuit. Basically, if you were to break away the plastic housing of the female plugin, you will notice some electrodes on either side. When nothing is plugged in, then the circuit is broken. When the male plug is plugged into the female, the metal prongs of the male plug touch the electrodes inside the female plug, completing the circuit. This is what allows the electricity to operate things plugged into the table, such as a water pump for an indoor water garden or growth lamps for propagating annuals during the dark wintertime.
The green or naked wire is the ground wire. This is primarily a safety feature. Some brands of electric cables will have the ground insulated in green and some will just leave the ground naked. The ground is usually screwed on the green screw of the electrical fixture and also to the electric box. This allows for a power surge to have the excess electricity to go into the ground, preventing dangerous shorts, which can cause fires. Note, if you have plastic electric boxes with nails affixed to them for easy installation to a 2X4 or other wood, you will want to wrap the ground wire to one of the nails.
When looking at the outlet, switch, or other type of electrical hardware, you will notice three to five screws which also have colors. The screws are not painted, except for the ground screw, which is green. The other screws are brass and silver or chrome color. There is a famous saying said by most electricians and contractors, though a bit off color, it does make sense. “Brass will fry your ass,” is a good way to remember that the brass screws are to fasten the hot or black wire to the outlet or switch. The silver or chrome screw fastens the neutral wire, or the white wire. The green screw will fasten the ground wire, which is either green or naked.
It is very important to have these wires fastened to the proper screws. These screws are not only the wire fasteners, but they also conduct the electricity, and are screwed into the electrodes which are inside the outlet.
Functions of electrical hardware can vary. The functions of the hardware you will probably have on your electric table include plugs and switches. The function of a plug is rather obvious. Switches, on the other hand are different. Switches can be installed into an electric table if you don’t want to unplug different features, like small indoor fountains or growth lamps.
Switches are wired differently from electrical outlets. With a standard light switch, you have only two brass screws. This is because the neutral wire is not connected to the switch. The main function of a switch is simply to break the circuit. When it’s in the off position, the current in the hot (black) wire does not go past the switch. When the switch is on, then the current goes on to complete the circuit, thus turning on the light or fountain.
GFCI outlets are recommended for electric tables being used for container gardens. A GFCI outlet is wired much like a regular plug, but it has a special circuit breaker built into it which will trip if water gets into any outlet in the circuit. Water is a conductor of electricity and can cause you to get an electric shock. The GFCI outlet catches the moisture and automatically trips the circuit, shutting off the electric current before anyone gets electrocuted. For container gardens, this type of outlet should be wired right to the cord which goes to the wall. You only need one GFCI outlet for the entire circuit.
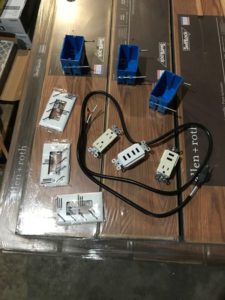
Different electric hardware for an electric table
Construction materials to build an electric table are rather simple. All you need to do is simply go to a lumberyard and purchase several eight-foot 2X4s and cut them to size and screw them together in the form of a table. When fashioning the skeletal structure of the table, you shouldn’t use nails. Use screws instead. Typically, when using screws, you need to drill a pilot hole to avoid splitting the wood, however, there are some special screws which work as a drill bit and screw and makes the pilot hole as it goes into the wood. Ideally, you want to use a power drill to screw the 2X4s together.
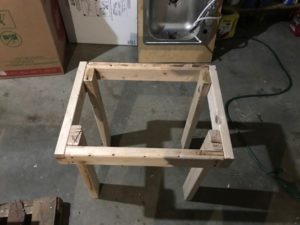
Basic construction of the table
Once you have the table put together as seen in the photo above, you will need to run some extra 2X4s in the middle. This is not only to add extra strength to the table, but also allows you to fasten the electric boxes to the bottom of the table in which all the electrical fixtures are housed.
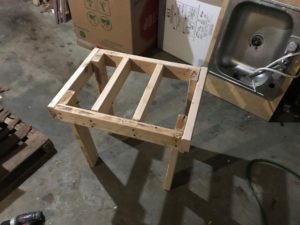
Notice how the table looks with the extra 2X4s in place
Electrical boxes can be found in any hardware or home improvement store in the electrical department. Electric boxes are either made from a galvanized steel or fire-resistant plastic. The electric boxes are typically fastened to the 2X4 and you can punch out holes where wires going to the fixture can go into.
One caveat with installing the electric boxes, however, is not to install them until you have the table top installed. You want to mark where all the electrical fixtures are to be wired at and then with the table upside down, you will want to trace the outline of the electric box onto the bottom of the table top. Then, using a jigsaw and a drill, cut out the holes for the boxes into the table top.

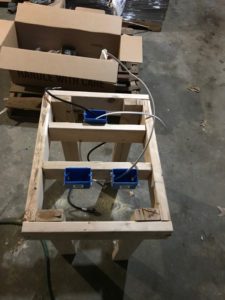
How to lay out the electric boxes on the underside of the table
Choosing the material for the table top is not as complicated than it might seem to be. There are all kinds of different materials you can use, varying from fine woods to laminated particle board to coreon. Coreon is a stone-like acrylic-based surface which can be difficult to cut. Fine wood has to be stained and varnished, which can be prone to water stains if used as a table for container gardens, however, you can use a spar eurathane varnish designed for outdoor weather will work well for this purpose.
Laminated particle board can be the best choice for those of you who do not want to mess with stains or varnishes or do not have the tools to cut through harder materials, such as coreon or stone. Choosing your laminated particle board has to be done with care. As you can see, I chose a basic laminated particle board used for shelving for my table, but when creating an electric table for a container garden, you want to make sure that the laminated board is waterproof.
Laminated particle board
Once you have chosen the material for your table top, and it’s cut down to size and the holes for the electrical fixtures are cut, you will want to use a wood glue or gorilla glue and apply it to both the top 2X4s and the bottom of the top. To enforce the adhesive, simply hammer in some finish nails in to reinforce the top to the skeletal structure.
Installing the electrical boxes and fixtures is rather easy and you do not need to be a licensed electrician to do it. Make sure the electric boxes are flush with the surface of the table top and nail them to the 2X4 under the hole. You need to punch the hole on either side of the box to place the wire.
Wiring the electrical fixtures is rather simple. When you cut open a wire and see the three wires, you may want to cut enough outer insulation out to cut a certain length of each of the three wires. You then want to peal back some of the insulation from the hot and neutral wires and using a pair of needle-nose pliers, bend a small hook in the naked wire. Then hook the bent wire on the screw on the fixture and tighten with a screwdriver. If the ground is in green insulation, do the same thing and screw it on the green screw in both the box and fixture.
If using the same circuit to connect a number of fixtures, you might have to connect a couple of wires together with a wire nut, which is a small insulated plastic cap which twists two connecting wires together. You might want to reinforce the connection with electrical tape to prevent arching within the fixture box.
Electrical fixtures, such as switches and plugs do come with a plate, which can be screwed onto the fixture with a couple of screws that come with the plate packaging.
Note, that most of the house wiring you will use for connecting all the fixtures in the table circuit will be a thick single filament, but the extension cable with the male plug for the wall is poly-filament, thus you may need to use care in connecting that to the regular wires.
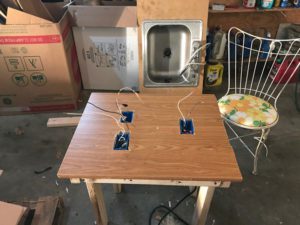
Once you have completed your electric table, you will have a base for the amazing adventures in container gardening from growth lamps to propagate annuals to a delightful indoor water garden. See graphics below on proper ways to wire an outlet and the finished product.
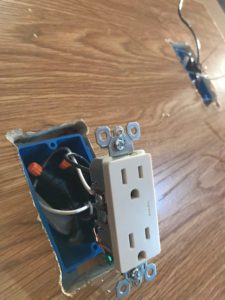
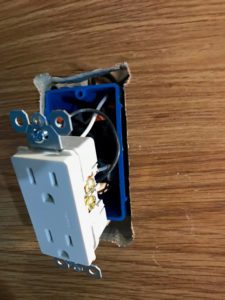
Proper installing of an electrical fixture, notice in the second image, grounding is necessary. With plastic electric boxes, add the ground wire to one of the nails before placing the top on.
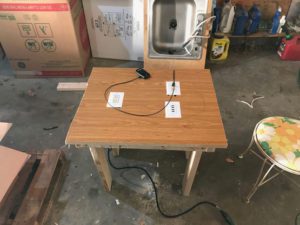
The finished product


